Tuesday, January 29, 2013

I'm so happy, I'm so happy!


What a great day! The sun is shining, the birds are chirping and it is 65 degrees out (from 30 earlier this weekend!). Better yet though, I am on my way to a major project I have been planning! I won't be revealing ALL my secrets just now. But my master plan (bwahahaha!) has been to add a fireplace to my sunroom. We have our kitchen table in our sunroom (which is attached to our kitchen) and I use the eat-in in space next to the kitchen for a sitting area.
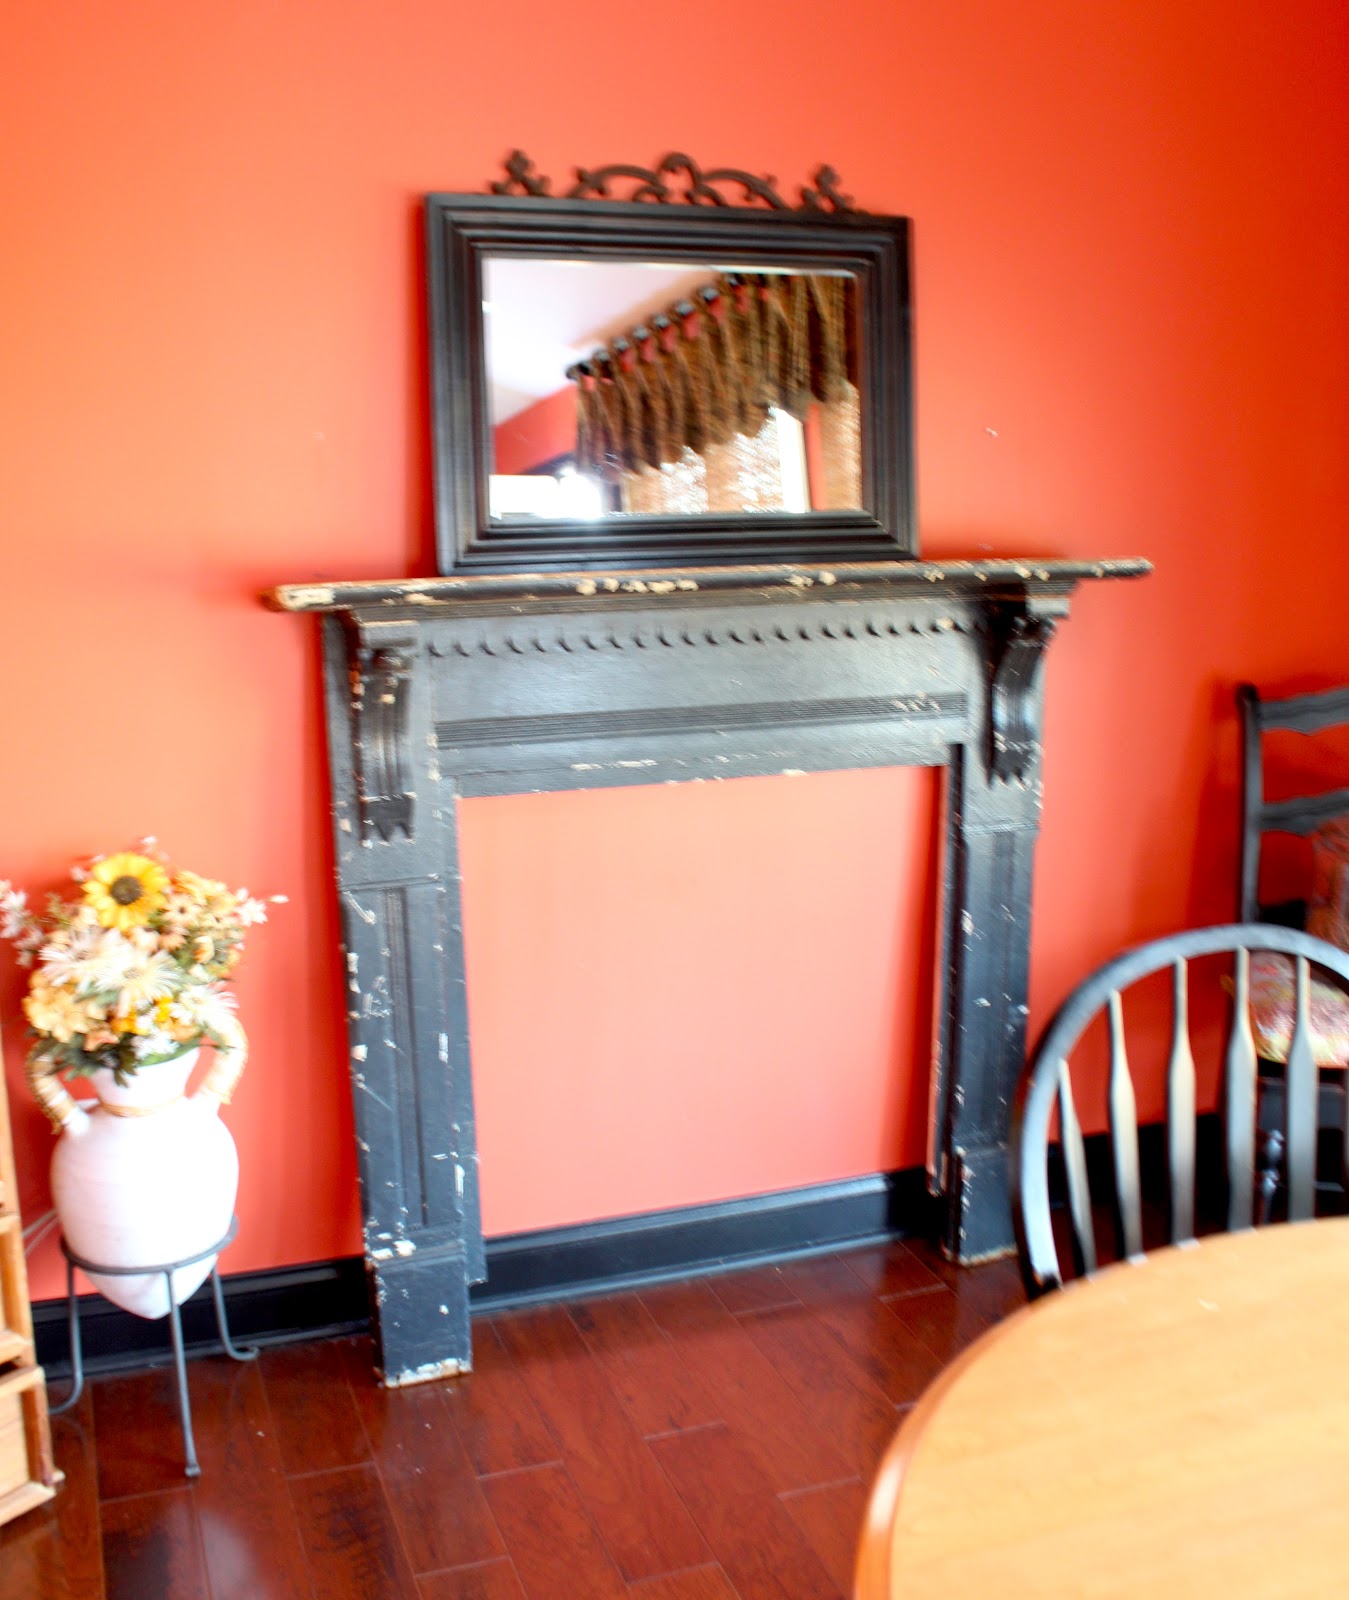
Here is our sunroom (Oh yes my friends, that IS a orange room! I love it!):
And here is our eat-in area turned sunroom:
That is the area where the table is meant to go. That is the end of the kitchen island there at the bottom left of the photo. (Wow, do I need to get some photography lessons!) I actually switched the areas one year just for winter since that sunroom are gets so cold. Then I found everyone used the new "sitting area" way more than they did when it was in the actual sunroom. PLUS I had lots of company now when I was cooking! The hubs or kids would lounge on the couch while I prepared meals. I love that!

But that sunroom is still cold when we are eating dinner in the winter. I'm sure it does not bother my hot-blooded boys but I freeze in there! See how there are all those big windows? And we get a LOT of wind on that end of the house. So I decided that I wanted to add a electric fireplace in there. But I did not want it to look cheesy! I saw a couple prefab ones that were "OK" but just not what I was looking for. So I have been keeping my eye out for the a great old mantle. And here it is! I found this at The Empty Nest when I went to talk to Janet about my Milk Paint problem last week. I had already lost out on one mantle I'd had my eye on at the Lucketts Store. Now I know, if I go home and can't stop thinking about it, I need to JUST BUY IT! But it worked out because I love this one SO much more!

Look at it! I'm in love!
I had to bring it right in and set it up where I want it!

The details are what got me - look at those little finials hanging down:
It will be awesome once I sand it down and re-paint it.

Janet and I had a fun time fitting it into my car. It was a TIGHT squeeze, I can tell you. We tried it through the back one way, then the other. Had it almost in, except one little corner would not cooperate. then we had to bring it through the side. I was skeptical. But knowing Janet probably has GREAT experience packing fabulous finds into vehicles I went with it. We had to kind of swing it in the side door starting at one end. Think of fitting a horseshoe through a mousehole! Nuts!

Of course, my excitement was so built up by the time I got home I had NO problem getting it out and into the house by myself! Any...hooooo. It is going to look FAB' once I get it all set up. Now I need to buy a fireplace insert to set in the wall. And I am sure I will have to build up behind the mantle. But the first and hardest step is done! Finding the perfect mantle to build the whole project around! Yay!
Stay tuned!

Sunday, January 27, 2013

I can't get enough of burlap!


I have had a few framed burlap images saved on Pinterest.
I was having a hard time deciding exactly what I wanted to do or where I would put it.
I love this one:
You can read all about it at Flea Market Trixie's blog HERE
She used her maiden name, her boyfriend's last name and their house number.
I had pinned this cute little piece from Domestically Speaking:
And ended up using her technique as explained here.
To make this cute little sign! I used all our birth dates and our wedding date in chronological order.

Close ups of date...
 And bottom.

This was such a simple project. Seriously! I should be calling my blog "A Monkey Can Do It!". I can't remember where I saw the idea for the dates and saying. I have had it written out in a file on my mac for a while just waiting to use it. I think this took me about 15 minutes to do! All you need is a printer, burlap and some freezer paper. I got my freezer paper at Giant (I'm sure WalMart has it too). I almost missed it. There was only one brand, just one row, kinda tucked in by the wax paper. It is basically white paper on one side and wax paper on the other. Cut a piece of burlap and a piece of freezer paper to 8.5" x 11". Lay the burlap down and then the shiny side of the freezer paper down on that and then iron them on medium. This will bind the freezer paper to you burlap. Then all you have to do is run your burlap straight through your printer and "voila!" you are done! So easy and cute. And now hubs won't get mad at me for always forgetting our anniversary (I know, I know - men are supposed to be the ones that forget, right?!). Because I certainly did NOT make the first one with the wrong date! What loser would DO that?

Next I need to figure out what I want to do with this salvaged cabinet door I got. Maybe a sign? A initial? Any thoughts?!

Thursday, January 24, 2013

Milk Paint Coffee Table - a lesson in trial and error!


When I last left you I was have some problems with my first attempt at using Miss Mustard Seed's Milk Paint. I had a
bit of a problem with one side of the table. Basically the paint all fell off. You can read about that here.

So I had to salvage what I had done. And again, since I am lazy, I refused to sand it all off and restart. I paid a visit to Janet at The Empty Nest in Warrenton and chatted with her about my project. We had a nice talk about the pros and cons of milk paint itself. The beauty of milk paint is that if you don't do any prep work the paint will chip and self distress in a pretty unpredictable manner. There does not seem to be any rhyme or reason to how much chipping you get on which type of finish. You would think, the glossier the finish, the more distressing you would get. But that is not so. So the pro is ALSO the con! She suggested I use some bonding agent on that side. Or start over and use the bonding agent all over. I pretty much pretended I did not hear that second part.

So now the one side of the table had progressed like this: First, a coat of Linen milk paint that produced some mild chipping. Second coat. Both coats of paint entirely fall off (what the...?!), except for 2 small patches. Another very thin coat of paint. ANOTHER coat of Milk Paint with bonding agent added. Ergh. And then I still had to do some very creative spot touch up. And sanding in between.

Anyway. Live and learn! Here is the finished piece.
Ignore the glass table top over there leaning against the couch!
I still need to get Mr. Muscle to take the other coffee table downstairs.
 And I'm not hating that Christmas poinsettia still hanging around. The white was the right way to go.
This photo shows the side that originally fell of completely. It's still a lot more distressed than the rest of the table. All in all I am happy with how it turned out. I love the vintage feel of it. I may still move it up to my master sitting room though. I keep thinking all those drawers would be perfect for housing my insane amount of jewelry!


Tuesday, January 22, 2013

Milk Painting for the first time... and ribs!

I decided to take my first shot with Miss Mustard Seed's Milk Paint. I bought this awesome little piece for a steal from a neighbor. Her kids were using it as a painting table so it had a few stains and paint blotches on the top. The top planks and the ones on the bottom are pulling away a little. There were just a few minor scuffs on it as well.


I knew as soon as I saw it I wanted to paint it. Now I am not going to lie. My initial plan was to paint the entire piece. But then I started looking at all those drawers. All. Those. Drawers... So.... THEN I decided it would be way less work more artistic to paint everything BUT the drawers. That will look cute!

I had grabbed some MMS Milk paint on my way back from the barn sales last weekend at Lucketts Store (insert floating hearts here! Love that store!). The paint is on sale there for 30% off so if I'm going to try it now's the time! I got a box of the Graphite and then a sample of the Lucketts Green and Linen. I decided to use the Linen (off white) and then I can use it as a coffee table in either my living room OR my sitting room. I'll figure that out after I'm done!

Milk Paint comes in powder form and then you mix it yourself with warm water. I mixed up the paint. No big deal. Not scary at ALL! Then I put on the first coat. Awesome. Looks fine. Very messy but fine.

I then proceeded to wait the suggested hour for that coat to dry. I came back and checked it out. It was looking great! Chipping just a little JUST like I wanted it to. Who said this stuff is unpredictable? Ha. So then I walked over to the OTHER side. OMG. It was completely bubbley and chippy. The WHOLE side. Just one side. I touched it and the whole side of paint literally fell off the table. Just fluttered off like a bunch of feathers to the floor. ARGH! Now what. Google... More google...

The picture above is the side that "fell" off. See. At first it was just chipping along nicely.
I did not take a picture of the after. I was so freaked out that it just fell off that I lost my composure.

So off to The Empty Nest in Warrenton to chat with paint expert Janet. I'll just let you know what happens!!!

On to nicer things!

At least I had one success today! I decided to try baby back ribs in the crockpot. Helloooo! Now THAT worked out perfectly! I got two racks of pork ribs. Cut them with my kitchen scissors into 3 bone portions. I sprayed a little no stick spray in the bottom of the crock pot (not sure why. I won't next time). I placed the ribs standing around the perimeter of the pot, meat side out. I used about a half a bottle of barbecue sauce and let it cook on high for 5 hours. Then I took out the ribs and laid them on a foil lined pan and broiled them for about 5 minutes. I slathered on more sauce after that. And served. They were SO yummy! They literally fell of the bone. So moist and a ton of flavor.
I cannot believe I have not done this before!
This is how they just fell off the bone! Yummers!!!

Wednesday, January 16, 2013

Black Doors and Burlap Pillows!

Wow! Is the sun ever coming out here again? I was waiting for some nicer days to take photos but CLEARLY that is not happening any time soon. So excuse the bad (even worse than usual) photos!

I showed you my black basement doors last post. I decided to go ahead and paint the front door as well. We had had the outside of it stripped and painted black in the Fall. We have a composite door that was stained to look like wood. It was gorgeous! For about 3 years... Then the fading started. And the peeling. And some more fading. You get the picture. So we stripped and re-stained. And one year later... the fading again.

Well, if you haven't figured it out yet I am LAYYYYY-ZEEE! There is no way I want a front door I need to upkeep on a YEARly basis! No way, no how!

Anyhoooo... Tangent. Sorry. Sore spot!

Here is the before of the front door:
And here is the after:
So, again, the black is just really making my other black blend into the house better. The rug has a black background and then the sconces are black as well. The dining room to the left has wallpaper that has a black background. And I have a ton of black furniture throughout the house as well as black trim in some rooms.
I could not take these arctic conditions any more and had to put my lemon wreath back up on the inside of the door too. I just need some promise of spring and color right now.

January to spring just drags on so here. Once the holidays are past I have no patience for the cold weather! I think I am going into hibernation mode.

Now I told you that I had gotten my new sewing machine. I busted it out of the box, set it up and immediately had to make something. I am the queen of immediate gratification. It really doesn't matter if I know what I am doing or not.

I had bought a couple of burlap coffee sacks at a barn sale for only $7 each - such a steal! And if you saw my slipcovered couch post you know I was hungry for some new pillows. Again. Since I am lazy. I basically just stuffed one of my old pillows down in the bag and sewed the sides. Ha! 

And then the finished pillow. Sitting with my favorite ruffle pillow. They look cute together, don't they?
And here is the back of it. An that is the existing side seam that I just left. For character. Or laziness - or whatever!

So I am pretty proud of this sewing experiment. Hopefully the seams don't burst open on me. Now I just need to replace those other two pillows on the outside and this will be the perfect place to hunker down until spring!

Monday, January 14, 2013

Basement Doors - Back in Black

I am finally, FINALLY, getting around to doing this. I really need to kick up my efforts on the Man Cave this year.
The kids are getting older now and they are really only down there for video gaming. We have a big ole supply of toys in a corner for when we have parties and all the younger kids come over. But the Hubs has been talking about a pool table possibly so I think that is my CUE (ha ha) to start making it a little more adult down there!

So there are a LOT of plans we are batting around. But this one was the easiest and after seeing
Thrifty Decor Chick's post HERE on getting hers done I decided to make that the project du jour.
Well, it will take MORE than one day but I have done 2 doors so far.

Before:


After:
Looks SO much better right? This is the bathroom door at the bottom of the stairs to the basement.
The black door really brings out the other black accents in the bathroom:
 This picture is taken through the mirror - so those marks on the door are not bad painting... Um... just a dirty mirror!
 And here is the door to the toy closet (soon to be craft closet! Shhh.. don't tell!)

I used Benjamin Moore Aura paint so it only took 2 coats straight over the builders painted white door.
The color is actually Sherwin Williams Tricorn Black. Since I already have that color in my kitchen and family room
I know I like it. What do you think? I love how it makes the white trim really pop.
AND it hides all the dirty door since no one here seems to be able to figure out what the KNOB is used for!

Wednesday, January 9, 2013

Surefit Slipcover Review - or - My "New" Couch!

I have a love/hate relationship with one of the couches in my house. Okay. More than one... But today we will focus on this one that is in my master bedroom sitting area.


I bought this couch about 14 years ago when we moved into our first house. It was fairly inexpensive already but I got it on sale as well. I love a good deal! Love.

So I still really like the lines of this couch. The back has that little bit of a curve and the seat is SUPER deep! It's just perfect in my sitting room where I curl up with my pooch to watch my chick shows that my boys just roll their eyes at! What I am not so in love with is that dated burgundy striped fabric. Bleech. I already ditched the original pillows and added some others in browns and golds in a effort to make it blend with the room better. Did. Not. Work. Now I know we are going to need to buy new or reupholster our family room couches soon. So I will not sabotage myself by even SUGGESTING that we buy a new couch for this room. The rest of the master is done in cream and browns. So I am thinking a cream or linen couch would really look nice in here. And I am the only one who uses this couch (other than aforementioned dog) so it should stay fairly clean.

So I decided to take a chance, and ran to Target this morning. I am a total instant gratification girl so once a idea is in my head I want it done ASAP! Like, YES-terday! There wasn't much selection but they had the exact one I wanted/needed/ thought would work. That NEVER happens to me. I mean, really, never. This one is just a nice plain, cream sailcloth. The SureFit website is selling it for $109 but at Target it was $55! Lovely!

Here it is when I initially got it pulled down over the couch. I was nervous, I have to say. I had a bad breakup with a slipcover before so I went into this somewhat skeptical.

It was really wrinkley so I steamed it before I tucked it in completely since I knew that would affect the drop some. So far so good. And I'm loving that it matches my bench turned coffee table!


Here it is completely steamed and pulled over the couch and tied
.

And with the pillows added...


Do you now see what I see? No, not that my photo is bad... Of course. I need NEW pillows now! Those are not doing it for me. I am thinking some linen and/or maybe burlap ones? Maybe stenciled. Or grain sack? I will wait for an epiphany to hit! By the way, this picture is AFTER I sat down and scrooched around a little! So it seems to be staying put pretty well.

Sad though because I LOVE these ruffle-y pillows I got at Pier1:


I'm going to have to figure out how to make those cuties work.


But, OH - it looks SO much better in there already! And for only $55 dollars! Yay!

Tuesday, January 8, 2013

My Living Room - made to LIVE in!

Let me preface this with a little about me and my family. First of all, I am the ONLY female in this house! There is my hubby, my 14 year old son and then my 12 year old twin boys. And then my two male dogs. LOTS of testosterone floating around this house! I love to hang out with my family... mostly. Here is the problem though. When football season is in full swing (like now!) I just do not want to sit and watch every game with them. Don't get me wrong. I can sit through a couple of the good games. The big games. But every pre-show and college game.... Um, no thanks. So I like the idea of being on the same level of the house with them (it's really just the Hubby ad older kid watching these) but I can only subject myself to so much football.

So I recently "did" my living room. We have been in our house 6 years. When we first moved in I was a CAbi clothing consultant. I loved selling the clothes and still love the brand. My living room was my "store". I had a few pieces of furniture in there but by no means was it decorated. It was just mostly a showroom.
But now...


Here it is! I really love it so far. I still have a little tweaking to do. I'd like to bring in some more color. Right now it's very neutral with golds, creams and browns. I would love to pop a little more green in. But it is OH so comfy! The sectional, the pillows, the lighting... oozing comfy! So I can come and sit in here and read and still be near my boys but in my own little comfy, feminine oasis!


There are just a lot of details in here that I love. And really the only pricey item in this room is the sectional which is from Michael Thomas. My zebra print chairs are from Havertys and the ottoman is from HomeGoods. And the window treatments were like $29.99 from JCPenney! How do you like THAT?!


The trellis rug was a black friday purchase from Overstock. The 2 pieces of art on the left wall are from Home Goods. The clock is from AntiqueFarmhouse.com. The oak side table was actually a washstand from a bed and breakfast my husband an I stayed at before we were married. I love that that piece has such meaning for us. I feel the same about the dress form (I was a Fashion Illustration major at college). There are also some subtle seaside touches in this room with the seagrass shade on the lamp and a few shells on the tables here and there.


My first Annie Sloan Chalk Painted item is in this room too! 


So lots of things I love are in here which makes it a perfect room for me to escape to! Here is my leftover live poinsettia from Christmas - dare I try and keep it going until next Christmas?! And my 2 bird wire cloche pillar holders that I got recently from One Kings Lane (another favorite shopping source!)


So that is my "new" Living Room! I will update after I get the art on the walls finished to where I love it. 
Do you have a favorite spot in YOUR house?

Saturday, January 5, 2013

A quick and tiny update for in between seasons...

So now all the Christmas decorations are down and its too early to start "springing"up the house. Wah. This is the really the time of the year I hate the most. Winter is pretty much useless to me once the holidays are past! I guess that's why people focus on organizing in January and February. So I, like everyone else, start clearing out the clutter and junk! I already cleaned out the storage room. What I really need to do now is organize my office. (insert procrastination here!)

La, la, la... Moving on!

My mom was here visiting over Christmas and commented on the trunk I use for a coffee table in my kitchen sitting area.

She suggested I use it to store my holiday dishes or something. Seriously. I thought it was sitting there empty! Well, I opened it up and found some stuff in there I did not even remember were there! I love that! There was a basket... full of pinecones no less (glad I went scouring around the neighborhood for all those pinecones - Duh!), a small burlap coffee bag (wheels turning!) and some other odds and ends.

SO... this year I bought cream colored poinsettias because I though they would transition better from winter to spring. I had them on my living room coffee table in a little snowman bucket for the holidays. Obviously that had to go with the other holiday decor because I am now in the denial phase of winter. What better to put my little poinsettia in than the burlap coffee bag?! Think outside the box!


By the way, that cute wire bird cloches with the candle in it is from OneKingsLane.com. If you are not signed up to that site you need to be! They have the BEST stuff at really great prices! FAB-U-LESS!

I recently spruced up my living room and I really love it. I will post on that soon!